Difference between revisions of "Router Table"
Jump to navigation
Jump to search
m |
|||
| Line 65: | Line 65: | ||
=Tooling= | =Tooling= | ||
*1/4 Router Bits | |||
*1/2 Router Bits | |||
=Maintenance= | =Maintenance= | ||
*Dust cube cabinet below table may need a thorough cleaning occasionally | |||
*Height adjustment screws/mechanism may need cleaning to remove dust from the mechanism that causes friction | |||
Revision as of 08:06, 8 October 2022
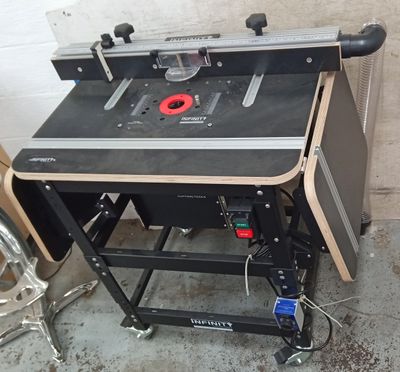
About our machine
- Model#: RTP -103
- Brand: Infinity
- Router Model: Triton 3-1/4 HP Plunge Router (116-270)
Guides and Manuals
- REQUIRED VIEWING - Instructions for Infinity Router Table - Port City Makerspace
- Assembly Instructions (multiple files)
Instructions for Use
Installing bits:
- Lower the router and hit the red “Stop” button.
- Inside the cabinet, turn the switch on the router itself off and make sure the switch cover is closed.
- Raise the router all the way up until the locking pin engages.
- Insert the bit into the collet, using the appropriate size collet (¼” or ½”).
- Use the wrench to rotate the nut in a clockwise direction.
Ring size:
- Make as large as possible for best suction, but small enough so your workpiece won’t fall in.
Adjusting height:
- The adjustment screw is through a hold in the table to the left of the router.
- Use the long wrench in the table opening to adjust your height up and down.
- Make sure the end of the wrench lines up with the adjustment screw below the table. Guide it straight into the hole.
- CAUTION: If you feel resistance, DON’T FORCE IT. It should move freely, so re-check what you are doing or ask for help if it does not.
Adjusting Speed:
- On the router there is a small wheel with numbers.
- Move the wheel to the left to increase the speed, right to decrease the speed.
Removing bits:
- Lower the router and hit the red “Stop” button.
- Inside the cabinet, turn the switch on the router itself off and make sure the switch cover is closed.
- Raise the router all the way up until the locking pin engages with the shaft. You may need to rotate the shaft until it clicks into place.
- Use the wrench to rotate the nut in a counterclockwise direction to loosen the bit.
- When you rotate the wrench, it will suddenly get loose. Rotating it once more will start to feel tight again. Keep rotating and it will loosen again and fully release the bit.
Dust Collection:
- Open the gate for the dust collection.
- Turn on the dust collector.
Power:
- Open the cabinet below the table to access the router.
- Slide the cover for the switch back, and turn the power switch on. The cover will stay open while the switch is on.
- Plug in the machine.
- Press the green “Start” button on the outside to turn it on.
Common Courtesy:
- Press the red “Stop” switch to make sure the router is off.
- Turn off the router inside the cabinet.
- Clean up any dust or debris on the table and inside the cabinet.
- Remove router bit and collet.
- Clean any dust out of the collet, and wipe the area the collet sits in the router with a dry cloth.
- Leave the router raised so it is ready for the next person to set up.
Videos
- How to Install and Use the Infinity Router Table Insert Plate RTI-INF1
- RTP -103 Professional Router Table Package (Overview)
- How to Use a Wood Router Table - woodworkweb
General Tips and Safety
- Dust Collector: connected to gate behind the machine
- Ring size: make as large as possible for best suction, but small enough so your workpiece won’t fall in
- Adjusting height: check the Lock before adjusting
- Collet: has a self-locking feature for one-hand tightening/loosening
- Common Courtesy: Clean up, remove router bit, leave router raised
Tooling
- 1/4 Router Bits
- 1/2 Router Bits
Maintenance
- Dust cube cabinet below table may need a thorough cleaning occasionally
- Height adjustment screws/mechanism may need cleaning to remove dust from the mechanism that causes friction
