Difference between revisions of "Shapeoko 3"
Jump to navigation
Jump to search
m |
|||
| Line 17: | Line 17: | ||
==Shapeoko Operating Instructions== | ==Shapeoko Operating Instructions== | ||
# '''Pre-requisites''' | |||
## Have your GCode file already made using your software of choice. We generally use VCarve Pro. | |||
## Have your material ready and sized to fit on the machine you are using. | |||
## Have your tool(s) for the cut(s) you are running. | |||
## Have your safety glasses and hearing protection. | |||
# '''Power On''' | # '''Power On''' | ||
## Examine machine. Make sure it is clean, clear, no tools left on it or in the router. | ## Examine machine. Make sure it is clean, clear, no tools left on it or in the router. | ||
Revision as of 09:39, 28 June 2023
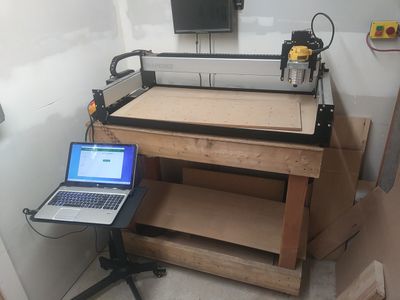
This page describes some of the specifics of this CNC Machine.
For more general resources please go to the CNC_Routers page.
About our machine
- Model: Shapeoko 4 XL
- Cutting Area: 33"(X) x 17.5"(Y) x 4"(Z)
- Spindle: Dewalt Trim Router (accepts 1/4" shank)
- Computer: Laptop running Windows 10 connected via USB
- Control Software: Carbide Motion
Guides and Manuals
- Shapeoko CNC A to Z - Running a job - a very thorough community-written guide for using Carbide Motion.
- Shapeoko XL Assembly Guide - A helpful anatomy of the machine.
Shapeoko Operating Instructions
- Pre-requisites
- Have your GCode file already made using your software of choice. We generally use VCarve Pro.
- Have your material ready and sized to fit on the machine you are using.
- Have your tool(s) for the cut(s) you are running.
- Have your safety glasses and hearing protection.
- Power On
- Examine machine. Make sure it is clean, clear, no tools left on it or in the router.
- Ensure main power strip is on.
- Ensure computer is on.
- Turn on the CNC by twisting the red emergency stop button until it pops up.
- Starting up with Carbide Motion
- Open Carbide Motion.
- Click the "Connect Cutter" button to connect to the machine.
- Click the "Initialize Machine" button to home your machine.
- Click "Load New File" and navigate to your prepared GCode file. Select the file and click "Open".
- Preparing the tool
- Insert the appropriate tool for your GCode into the spindle and tighten it with the wrench and locking button on the side.
- The locking button can be difficult to press.
- Tip: hold the lock button and rotate the spindle by hand. When you feel the spindle lock in place, then you know it's locked and can tighten the nut down with the wrench.
- Preparing the material
- Grab a piece of material appropriate for your project.
- Many methods exist for securing the material to the work table. Briefly, these are: double-sided tape, screws, hold-down clamps, and custom fixtures.
- Make sure your material secured to the table, ensuring it is secure enough for the operation you plan to do.
- If you are doing a shallow engraving, double-sided tape should hold well enough.
- If you are cutting all the way through something thicker than .5 inches, it needs to be very secure. If you try to move it while clamped and it shifts at all, it is not secure enough.
- Zero the machine to the workpiece
- Go to the "Jog" screen in the upper right menu.
- Use the buttons to navigate the machine to the zero position. This will be determined in your GCode file, so be sure to remember what you set for a zero (or "XY Datum").
- Tip: Use the "Increment +" and "Increment -" buttons to change how fast the machine moves when you press the navigation buttons.
- As the tool gets within 1 inch of your material, reduce the increment to avoid crashing the tool into the material.
- When the tool is at the correct zero point relative to the material, go to the "Set Zero" button on the bottom row.
- Click "Zero All", then click "Done"
- Start The Cut
- Click on the "Run" screen in the upper right menu.
- Click "Start Job"
- Click the "Feedrate -10%" button and reduce the "Override" value on the left to 50%. This will give you more reaction time to stop the machine if it is going to crash at the start of the job. (You can increase this after it has been running for a minute with no issues.)
- Click "Start". It will prompt you to turn on the router.
- Use the power switch on the router to turn it on. Adjust speed dial as necessary.
- Click "Resume" to start cutting. Stay by the machine while it is running.
- Do not leave the machine unattended. If nobody is watching it and it crashes, it could do a lot of damage to the machine.
- Crash: If the machine crashes or otherwise needs to be stopped immediately, hit the red E-stop button to stop the motion, then turn off the router.
- Cut not going well: If it is not an emergency, you can stop the cut by clicking "Pause", wait for the machine to move the router out of the cut, then click "Stop" and turn off the router.
- After the cut
- Vacuum up the dust from the cut. Clean up on top of the machine, under the machine, the floor, and anywhere else dust went.
- Remove your material and any screws or clamps from the bed, leaving it completely clear.
- Remove the tool from the spindle and store it appropriately.
- Turn off CNC by pressing the red emergency stop button.
- Leave the laptop and power strip on.
